Your Ads Here

Showing posts with label controls. Show all posts

Thursday, 10 May 2012

Working of Datagrid or important tips for Datagrid using C#.NET


It shows the important tips for the datagrid using C#.NET. It helps to create column, rows and some useful tips.
Keywords: datagrid, .NET, DatagrigView. Csharp.NET

Creating Columns dynamically.
0,1,2….. are index for the column or you can give unique name for the column.
imp: In datagrid index starts from 0 onwards

dataGridView1.Columns.Add(Convert.ToString(0), "ColumnName1");
dataGridView1.Columns.Add(Convert.ToString(1), "ColumnName2");
dataGridView1.Columns.Add(Convert.ToString(2), "ColumnName3");

Creating Rows For the datagridview

dataGridView1.Rows.Add();
Imp: rows must be add only after the column created otherwise error will be occurred.

To Count No of rows

dataGridView1 .Rows.Count();

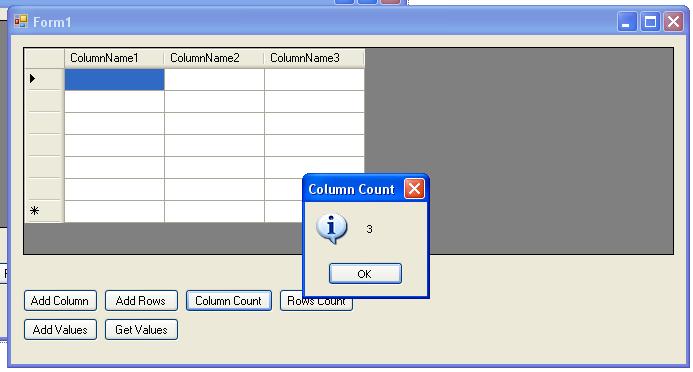
To Count No of Columns

DataGridView1.Columns.Count();

To add Data to the datagrid
Here Rows(0)  - index of the row to add the data (you can add data to different rows through changing index)* same for column
Cells(0) – Index of the column where the data to add

dataGridView1.Rows[0].Cells[0].Value = "Hello";
dataGridView1.Rows[0].Cells[1].Value = "Dear";
dataGridView1.Rows[0].Cells[2].Value = "Friend";

To Get data from datagrid

dataGridView1.Rows[0].Cells [0].Value();

To Clear rows in datagrid

DataGridView1.Rows.Clear();

To Clear Columns in datagrid

DataGridView1.Columns.Clear();                                                   

Here the complete code for the working of datagrid

using System;
using System.Collections.Generic;
using System.ComponentModel;
using System.Data;
using System.Drawing;
using System.Linq;
using System.Text;
using System.Windows.Forms;

namespace textcsharp
{
    public partial class Form1 : Form
    {
        public Form1()
        {
            InitializeComponent();
        }

        private void btnColumnADD_Click(object sender, EventArgs e)
        {
            dataGridView1 .Columns.Add(Convert.ToString (0), "ColumnName1");
            //0-index
            dataGridView1.Columns.Add(Convert.ToString(1), "ColumnName2");
            dataGridView1.Columns.Add(Convert.ToString(2), "ColumnName3");
        }

        private void btnRowsAdd_Click(object sender, EventArgs e)
        {
            dataGridView1.Rows.Add();
        }

        private void btnRowsCount_Click(object sender, EventArgs e)
        {
            MessageBox.Show(Convert.ToString( dataGridView1 .Rows.Count),"Rows Count");
        }

        private void btnColumnCount_Click(object sender, EventArgs e)
        {
            MessageBox.Show(Convert.ToString(dataGridView1.Columns .Count), "Rows Count");
        }

        private void btnAddGridValues_Click(object sender, EventArgs e)
        {
            dataGridView1.Rows[0].Cells[0].Value = "Hello";
            dataGridView1.Rows[0].Cells[1].Value = "Dear";
            dataGridView1.Rows[0].Cells[2].Value = "Friend";
        }

        private void btnGetValues_Click(object sender, EventArgs e)
        {
            MessageBox.Show(Convert.ToString(dataGridView1.Rows[0].Cells [0].Value), "Value");
        }
     
    }
}

form design

add column
Add rows

add values


column Count
Column Count

Get result


Friday, 27 April 2012

TextBox Control Changes in CSharp .NET


Keywords: TextBox, C#, Csharp, .NET, DOTNET.

Windows Forms text boxes are used to get input from the user or to display text. The TextBox control is generally used for editable text, although it can also be made read-only. Text boxes can display multiple lines, wrap text to the size of the control, and add basic formatting. The TextBox control provides a single format style for text displayed or entered into the control. To display multiple types of formatted text, use the RichTextBox control.

The text displayed by the control is contained in the Text property. By default, you can enter up to 2048 characters in a text box. If you set the MultiLine property to true, you can enter up to 32 KB of text. The Text property can be set at design time with the Properties window, at run time in code, or by user input at run time. The current contents of a text box can be retrieved at run time by reading the Text property.
The code below sets text in the control at run time. The InitializeMyControl procedure will not execute automatically; it must be called.

' c Sharp
private void InitializeMyControl()
{
        // Put some text into the control first.
        TextBox1.Text = "This is a TextBox control.";
}


TextBox Properties
TextAlign
HorizontalAlignment.Left
HorizontalAlignment.Right
HorizontalAlignment.Center
 
You can use this property to align the text within a TextBox to match the layout of text on your form. For example, if your controls are all located on the right side of the form, you can set the TextAlign property to HorizontalAlignment.Right, and the text will be aligned with the right side of the control instead of the default left alignment.

BackColor

The BackColor property does not support transparent colors unless the SupportsTransparentBackColor value of System.Windows.Forms.ControlStyles is set to true.
The BackColor property is an ambient property. An ambient property is a control property that, if not set, is retrieved from the parent control. For example, a Button will have the same BackColor as its parent Form by default. For more information about ambient properties, see the AmbientProperties class or the Control class overview.

BorderStyle
BorderStyle.None
BorderStyle.FixedSingle
 
A BorderStyle that represents the border type of the textbox control. The default is Fixed3D.

CausesValidation

Gets or sets a value indicating whether validation is performed when the TextBox control is set to validate when a postback occurs.

Enabled

Gets or sets a value indicating whether the control can respond to user interaction.
true if the control can respond to user interaction; otherwise, false. The default is true.

Font

Defines a particular format for text, including font face, size, and style attributes. This class cannot be inherited.

ReadOnly

Gets or sets a value indicating whether the contents of the TextBox control can be changed.

MaxLength

Gets or sets the maximum number of characters allowed in the text box.

MultiLine

Gets or sets a value indicating whether this is a multiline textbox control.
Name

Represents a control that can be used to display or edit unformatted text.

PasswordChar

Gets or sets the character used to mask characters of a password in a single-line TextBox control.

RightToLeft
RightToLeft.Yes
RightToLeft.No

Gets or sets a value indicating whether control's elements are aligned to support locales using right-to-left fonts.

ScrollBars
ScrollBars.None
ScrollBars.Horizontal
ScrollBars.Vertical
ScrollBars.Both

Visible
Gets or sets a value indicating whether the control and all its child controls are displayed.

Tuesday, 7 February 2012

Use buttons to slide a ListBox's selection up or down in C#.NET


This example shows how to use buttons to slide a ListBox's selection up or down in C# .NET.
Keywords: ListBox, select, selection, SelectedItem, SelectedIndex, SetSelected, C#.NET,Csharp.NET

To slide the selection up, see if the SelectedIndex property is greater than 0. If it is, subtract 1 from it. 

To slide the selection down, see if the SelectedIndex property is less than the second largest item index. If it is, add 1 to it. 

Here the complete Code.

using System;
using System.Collections.Generic;
using System.ComponentModel;
using System.Data;
using System.Drawing;
using System.Linq;
using System.Text;
using System.Windows.Forms;

namespace testc
{
    public partial class Form1 : Form
    {
        public Form1()
        {
            InitializeComponent();
        }
        private void Form1_Load(object sender,
            EventArgs e)
        {
         
        }
        private void button1_Click(object sender,
            EventArgs e)
        {
          
            if (listBox1 .SelectedIndex > 0)
                listBox1.SelectedIndex -= 1;
        }
        private void button2_Click(object sender,
            EventArgs e)
        {
            if (listBox1.SelectedIndex < listBox1.Items.Count - 1)
                listBox1.SelectedIndex += 1;
        }   
    }
}